|
UB-GPR Research Project Management
User’s Manual (UM)
Version 1.11f, last updated on 16 April 2012
|
|
|
|
Contents
1.1 Introduction to application
5.1 System log-in and log-out; help functions
5.1.1 Logging into application
5.1.2 Logging out of application
5.2.2 My GPR: importing projects
5.2.5 My GPR: management of warnings
5.3.11 Projects: project search
5.3.12 Projects: automated document generation
5.4.1 Options: budget templates
5.4.2 Options: new document template
5.4.3 Options: editing user profile
6 Personalization of environment
The objective of the user’s manual “Research Project Management” (GPR) is to provide instructions on how to use the application.
The manual is aimed at all users who are currently using the application or will use it in the future. The primary users of the application are:
The manual provides an explanation for each of the application screens. For each screen, one or more functions will be described.
The GPR application is a project management tool for use in research. It is designed to address the needs of research projects conducted by the UB Group so that they are easier to manage.
The application offers a set of functions available to all users, in addition to administration functions reserved for advanced users.
A system of permissions has been created to filter user access simply and effectively to certain project areas, such as accounting, personal data and passwords.Two Levels of permission exist in the application: profile and role.
Profile permissions define whether or not a user is allowed to carry out general operations in the application. They also apply to transversal operations across all projects.
Role permissions apply to operations specific to a project. They are given to a user who is assigned as a project participant.
Whether or not a user is allowed to carry out a given operation within a project is determined by the combination of the user’s permissions at the role level in that project and at the profile level for all projects. For example, a user may be allowed to consult the indicators for project X if he has permission to do so at the level of profile (for all projects) or if he has permission based on the role for which he has been assigned to that project. Of course, it is also possible that a user has permission at both levels.
Users can check their profile permissions via Profile -> Permissions, and role permissions in a project, if they have access, in the project participants section.
The purpose is to ensure that users understand the consequence of modifying permissions for each of the screens and operations that can be undertaken.
Based on the value of a user’s permissions, he may have access to some content in a section and not to other content, while still having access to the function.
Below is a list of values for the two levels of permission noted above:| Type |
Value | Description of permission values |
| Profile |
Modify all |
Allows you to create proposals and modify all data of any project. |
| Consult all |
Allows you to consult data of any project. |
|
| Modify own |
Allows you to create projects. |
|
| Consult own |
Allows you to consult data of projects you are assigned to. |
|
| Role |
Modify |
Allows you to modify data of a specific project you are assigned to. For each proposal, you can have different role permission values. |
| Consult |
Allows you to consult data of a specific project you are assigned to. |
The application is independent of the user’s operating system. The user only requires one of the following browsers to open the application:
A minimum screen resolution of 1024x768 pixels is required for correct display of the application.
For other technical considerations, consult the administrator’s manual (ADM) and the system’s functional specification (SES).
This section defines and displays the principal parts of the program in order to facilitate understanding of the remaining sections of the manual, in which the function and content of the parts are explained.
The section provides configuration options for user data, personalization of certain program areas, and the option of ending the session.
The section enables the user to carry out searches with or without filters.
The main menu contains set options, while the content of the sub-menus changes according to the option selected in the main menu.
The status bar contains the following elements:
This section presents the various functions and screens of the application.
Below the user can find out how to log into the application, carry out user authentication and end a session.
To log into the application, the user must open one of the HTTP browsers listed in the application environment.
After opening the browser, the user must type the address for the GPR program. The URL for the program is: http://www.ub.edu/gpr.
First the screen displays the authentication of users AUTEN-UB. Users are managed by the UB, so from the GPR can not create or manage users of the UB..
To access the GPR the users should be own a personal code from the authentication system of the UB. Initially all staff of the UB (PDI and PAS) is provided with authentication code, as well as external personnel that have applied previously.. For people who are not part of the group of SU staff or staff available to external code, and need access to the GPR. If any person not included within the community of UB staff needs an access code the principal researcher may request a code through occasional personal web application (http://www.ub.edu/gper/personalOcasional/faces/inici.jspx). You can also request a personal code using the forms occasional RTF (http://www.ub.edu/gprdoc/formularis/sol-licitud-PO-gpr.rtf) or PDF (http://www.ub.edu/gprdoc/forms/request-PO-gpr.pdf), and to be sent to Punt d'Atenció a l’Usuari, Serveis a Usuaris de l’Àrea de Tecnologies..
When the user has performed authentication correctly, the application will open.
Each user will have specific profile permissions. The profile of a user logging in for the first time is dependent on the profile established through AUTEN-UB. The user must contact a GPR administrator to change profile.

As noted in the previous figure, the application opens to the initial screen of the user’s personal workspace, where the user’s specific information appears. The user will be able to see the status bar distinctly in the lower part of the page.
A description of the configuration of this screen appears in the sections Configuration of application and personal workspace and Module personalization and functions.
To log out of the application, the user can close the browser or end session within the application itself.
If the user chooses the second alternative, he must click on the option End session, located in the upper right-hand menu of the application.
When this option is selected, the application will close the user’s UB session and show the screen for end of session. From this screen, the user will have the option to repeat authentication for the application.
If the user clicks on the option to repeat authentication, then the user will come to the option described as Logging into application.
The system’s help functions are available on all application screens by means of the following tools:
This section provides detailed information on all the operations related to sections for the personal use of the user and the projects to which the user has access. This set of operations can be performed if the user has adequate permission. Some screens will show different information, depending on the user’s permissions.
To gain access to the My GPR, the user must click on the link My GPR.
Entering this section, the user will be able to perform various functions explained in detail below.When the user logs into the application or clicks on the option My GPR, the Start section loads by default.
If the user is already in the section My GPR, he can go to this section by clicking on Start.
The central part of the screen shows a series of modules or boxes with different content. The user can choose which boxes to see, the colour of each box, where in the screen to show them, and what size they are.
The system remembers the user’s preferences even after the user ends the session.Below is a list of the boxes that the user may choose to change the initial display of the screen from the link for Configuration of user menu:

Each type of event appears in a different color, which can be configured at the application level. Clicking on a date on the schedule filters the elements planned for that date. If the user clicks on an element in the table beneath the schedule, a detailed view of the project in question will open, provided that the user has permission to perform operation 4.2 (workplan items) and operation 9.1 (meetings and coferences) for the project involved.
The user can also introduce a URL for a schedule in iCal format using the link Configuration. This will show the user’s diary including appointments from the iCal schedule.
The policy governing the appearance of an event in this box is the same as the policy governing an event’s appearance in the work planning boxes. The time of the event also appears.
Any deviations shown refer to indexes or data on the project’s execution Progress, Cost Performance and Economics. The range establishing what constitutes a deviation for each index can be configured at the application level.
On the Profile tab you can set the number of hours available in the current year (see "user profile"). The annual value of hours committed to the total hours of participation in research projects underway this year. Hours booked annual value corresponds to the sum of hours of participation in research projects in preparation for the current year. It displays a warning if the number of hours available is less than the hours committed to this year, and another, if less than the number of hours booked.
When a user logs into the application, the GPR system automatically checks whether the user is a participating in any GREC project. If so, the system imports the relevant project or projects from GREC so that the user has access to them.
If a user has created one or more projects in GPR and subsequently GREC is updated with these projects, the automated process will ask the user whether or not to assign the GREC projects to the projects previously created in GPR. The user will see the following screen:

This screen enables the user to match a project being imported from GREC to a project already created in GPR.
By
matching the imported project or projects to existing projects, the
user links them together. Project information in GREC takes priority
over project information existing in GPR (e.g., some project data
fields, budget and research team). Project information that is
exclusive to GPR remains unchanged (e.g. time planning, timesheets,
expenditure and income, schedule, etc.). Projects created in GPR and
not related to GREC projects will not undergo any change. GREC projects
that have no relation to any GPR project can be imported by creating
new GPR projects.
From the My GPR menu, the user can open Timesheets by clicking on Timesheets.
This operation is similar to Projects: timesheets, but from the user’s point of view. Here users input their own hours for projects in which they are officially participants.
The user will be able to see all projects for which the system permits the user to enter hours for work packages. The conditions are as follows:

Clicking on a project will display the set of work packages assigned to the user in the project:

The display will show one month, although users input hours daily. The user can change the month and year on display.
The working calendar for each year is configurable at application level. Holidays and other non-working days are marked. However, the system allows for reconfiguration at application level to enable users to input time on these days.
When a user inputs hours in a day, the system updates the totals. If the user exceeds the maximum hourly limits for a day or for the time allocated to the user in a project, the system informs the user.
Lastly, in the case of changes, the system notifies the user.
In the case of errors, the system also notifies the user of the problems.
To open the FBG accounting section, the user must click on FBG surpluses.
The new screen will display the following information :
The user will be able to enter the FBG code, along with two dates, to consult project income and expenditure in the period in addition to the project balance.
When the user has entered the data, the display will first show project information on total income, expenditure and balance. Then the display will show a detailed list of all expenses and income for the project during the selected period.
If the user wishes, the list of expenditure and income can be sorted by item.
If the user enters an incorrect FBG project code, the system notifies the user that the code does not exist or that the project has not been found.
To view data from any FBG project, a user must have permission to perform operation 6.3, Consult all projects. If the user has permission to Consult own projects, access will only be given to FBG projects which have the user’s DNI as principal researcher.
The user can manage warnings by clicking on the option Manage notifications. The user will see the following screen, provided that he has permission to perform operation 8.2:

This screen enables the user to change the configuration of the function for receiving notifications of project events.
Clicking on a project opens a screen for configuration of warnings for the project. The figure below shows the screen display:

The following options have not yet been implemented:
The system notifies users through messages in the users’ warning panels or by e-mail.
Two types of project events give rise to notifications.
The first type concerns the project schedule:
The second type occurs in a given moment as a result of a set of specific circumstances. They are called alerts and include the following:
For time-specific alerts:
In the specific case of meetings, users who do not belong to the project but have been invited to a given meeting will see warnings for the meeting displayed in their warning panel, according to the selection they have made for advanced warnings. They will also receive email notification when meetings of this kind are convened or are modified.
The user gains access to the Projects section by clicking on Projects, which is the principal log-in point for all projects. The user will see a display of all projects or only the user’s own projects, depending on his level of permissions for performing operation 2.5 List projects.
The project list provides additional project information, offering a quick view of its status by means of a variety of indicators, and it gives the user access to the projects.
If the user clicks on a project, a project menu will appear. The project menu gives access to screens described below, depending on the user’s permissions for the project in question.
A user can gain access to a project if his permission profile allows him to consult all projects or if it allows him to consult his own projects and he is assigned to the project in question.
If the user has permission to perform operation 2.1, he will see a button to create new projects.
By clicking on the button, the user will open a form for basic project data, shown in the section below:
When the basic project data has been input, the program will take the user directly to the participant screen to assign consortium members and individuals participating in the project.
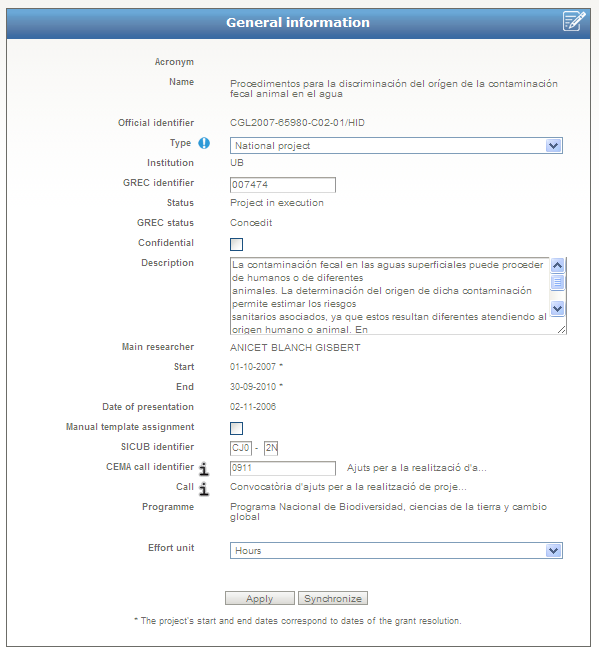
5.3.1 Projects: project data
By clicking on the option Project data, the user gains access to a form showing the general data for a project.
The user can modify it, depending on user permissions to the various operations involved:
- Editing is allowed, if the user has permission for operation 2.1. This also applies to creating proposals/projects from the project list.
- Deletion of proposals in preparation is allowed, if the user has permission for operation 2.4.
- Modification to GPR status is allowed for proposals/projects according to the status scheme below, if the user has permission to perform operation 2.6:
- Project status falls into one of the ten options listed below:
- Proposal in preparation: this is a proposal under development but not yet submitted.
- Submitted proposal: this is a proposal awaiting decision by the award body.
- Proposal in negotiation: this is a proposal that has been pre-accepted and is under negotiation with the bodies involved.
- Rejected proposal: this is a proposal that has not been approved and can no longer be modified.
- Accepted proposal: this is a proposal that becomes a project upon receiving approval by the corresponding body. In the case of the EU, a Grant Agreement is signed on acceptance.
- Lapsed proposal: this is a proposal whose allotted time for acceptance has expired without notification of acceptance or rejection. The system will use the proposal’s date of decision as stated in the call for applications. If the date of decision is not stated in the call for applications, the submission date plus a period of time that can be modified by configuration will be used.
- Unsubmitted proposal: this is a proposal that GPR has begun to manage, but that has not been submitted in the end.
- Project in execution: this is the stage during which the research is conducted and the project managed. A proposal must fall in the Accepted status to proceed to In execution status.
- Cancelled project: this is a project which has been definitively cancelled and can no longer be modified.
- Finished project: this is a project in which the research is completed. The project can no longer be modified.
- Modification of proposal/project status is allowed to users with permission to perform operation 2.7.
- Linking a project to an existing GREC project is allowed to users with permissions to perform operation 2.8. This is done by modifying the project type and entering the project’s GREC code.
Once a project is linked to the GREC system, project data from the GREC system cannot be modified, with one exception. The project start-date can be changed if the project’s GREC status is Requested.
When the form is accepted, project data will be imported from GREC, overwriting some of the data entered on the form.
The research team in the current GPR project will no longer be the official team. Instead, the research team will be imported from GREC. When GREC participants are imported, the bodies participating in the GREC project will also be imported. All of this information is displayed in Projects: participants.
If the box for Personalize budget template is deactivated, importing a GREC project will also import the submitted and awarded project, overwriting any project budget data. This information is displayed in Budgets.
If the project is an FBG European or national project, the FBG code is also imported to enable the system to import expenditure from the FBG system. If the project is of any other type, the system understands that its financial management falls to SICUB, enabling editing to the fields Program and Sub-program so that expenditure can be imported from the SICUB system. Importing expenditure is only available for projects imported from GREC and the operation is performed from the screen Income and expenditure. If a project changes accounting system or, in the case of using SICUB, the program and sub-program of the project are changed, imported financial transactions will be erased.
Any errors or inconsistencies in project information imported from GREC must be communicated to GREC administrators so that they can make the appropriate changes.
- When a project is first created, the user enters the project duration in months, using logical dates. The user can change them to real dates, deselecting the box marked Logical dates. Two new mandatory boxes will appear: Start-date and End-date. If the months between the two dates entered by the user do not correspond to the project duration previously entered, the program will issue a warning to the user.
Other functions available from this screen are:
- Assigning or displaying a call for applications. Two types of calls exist: CNMA and CEMA.
If the project is not linked to a GREC project, the system enables the user to link the project to one of the existing CNMA calls for applications. If a project is linked to a GREC project, the system also imports the CNMA call associated with the GREC project.
If the user has permission to perform operations 2.8 and 2.9, the system enables him to link the project to an already existing CEMA call for applications or import and link a new CEMA call to the project.Any errors or inconsistencies in project information imported from GREC must be communicated to GREC administrators so that they can make the appropriate changes.
- Assigning or displaying a program. This works similarly to CNMA calls. If the project is not linked to a GREC project, the system enables the user to link the project to an existing program. When a project is linked to a GREC project, the system also imports the program of the GREC project.
- Assigning a budget template. By default, the project budget template is dependent on project type. A default budget template exists for each project type. If the box Personalize budget template is activated, the user can select any of the existing budget templates. Even if the project is linked to GREC, the budget template can be personalized by unlinking the project’s financial aspect from GREC. Creating, editing and removing budget templates are available through the screen Options: budget templates. If the user changes a budget template for a project with a budget already entered, the entered budget data will be lost.
5.3.2 Projects: state
When the user clicks on State, summary project screen appears. The display (provided that the user has permission to perform operation 5.1) is shown below:
The information presented on the screen is divided into two parts:
- Main project indicators (located in the upper part of the loaded information).
- Project schedule (located in the lower part).
The project indicators provide information on significant project data such as:
The project schedule provides a visual display of the project plan, showing work packages, tasks, milestones and deliverables. For more commentary on the schedule, see the Schedule section
- Project start-date.
- Project end-date.
- Progress. Percentage of completion of project tasks. The system shows the weighted value of project tasks as a function of the weight of hours planned for each task and the degree of completion reported by researchers for these tasks.
- Cost performance index. This index indicates, in hours, whether the project is undergoing delays (value between 0 and 1) or, on the contrary, it is ahead of schedule (value greater than 1). It is calculated as a function of the weight of planned hours for each task and actual hours input by researchers in performing the task.
- Time. Percentage of project progress over time. This is a calculation of the present moment with respect to the project start-date and end-date.
- Project financial status. This shows a percentage of actual project costs against the accepted project budget.
- The percentage of actual milestones reached over total project milestones.
- The percentage of deliverables completed over total project deliverables.
- When an indicator could not be calculated because of lack of information by the abbreviation N / A is presented.
5.3.3 Projects: participants
By clicking on the option Participants, the user gains access to the screen for managing the bodies or institutions as well as the individual users collaborating on the project.
The screen for Participants will show the following information:
The user can modify the information depending on the user’s permission to perform operations as follows:
- Assigning, modifying and removing bodies from a project are allowed if the user has permission to perform operation 1.7. The system does not permit removing a body from the project if any existing participants still represent the partner in question.
- Assigning and modifying project participants are allowed if the user has permission to perform operation 1.5.
- Removing project participants is allowed if the user has permission to perform operation 1.6. The system does not permit removing any participants assigned to a work package. In order to change the assignment of a user to a work package, see Work packages and tasks.
- Modifying role permissions for each user assigned to a project is allowed if the user has permission to perform operation 1.8.
The user will first be asked to enter consortium members or organizations participating in the project. They are also called entities.
To add a partner, the user needs to click on the button Add and select one of the organizations appearing in the self-generated list.
The user must choose a coordinating organization from among the organizations in the system database. If only one organization is added to a project, it will be the coordinator by default.
The system will notify the user when the changes are applied.
If the user adds more than one partner, it becomes possible to remove any partners except the project coordinator. Entities that can be removed are easy to identify. A remove button is available for them. By clicking on the button, the partner is removed.
The entity will be removed and the system will notify the user when the changes are applied.When consortium members have been entered, the user can enter project participants. As in the previous case, the user needs to click on the button for new participants.
The user selects participants to add to the project from a self-generated list. User searches can be performed by means of first and last names or using DNI. If you want to add somebody out of the list you can create a custom project participant clicking on Custom participant creation, option at the list bottom. Projects with custom participants are not synchronized with GREC until all custom participants are changed with participants in GPR. You can change them by clicking on the Edit icon of custom participants
Remember that only participants with UB authentication code and enough permits can access projects.
Then, the user selects the entity for the added participant, which is determined by the entities added previously.
The user also assigns a role to the new participant. The assignment of a role depends on the permissions which the user wants the new participant to have.
Participants who are added manually through this screen can be official or unofficial. This piece of data is important when justifying project time, because unofficial participants cannot input hours. If a project is imported from GREC, the user will only be able to add unofficial participants. The application also enables the user to define who the principal researcher will be.
The system will notify changes to the user when they are saved.Modification of a user’s role is possible after the changes are accepted. A role can be selected from among the established roles or it can be personalized to give a user permission only to perform specific operations. In addition, a forecast of user hours on the project can be added.
The system will notify the user when the data are accepted.
5.3.4 Projects: work planning
By clicking on the option Work packages and tasks, the user gains access to time planning for a project. To use this link, the user must have permission to perform either operations 4.1 or 4.2, or both.
This section displays four screens, which are explained in detail under the following points.5.3.4.1 Schedule
To access the schedule screen, the user must have permission to perform operation 4.1. By clicking on the Gantt chart link, the user will open a Gantt chart with a summary of the planning for the project. The display of the screen is shown below:
The left-hand portion of the schedule shows the various work packages, tasks, start-dates and end-dates and periods of time.
The right-hand portion shows the elements listed to the right as a Gantt chart. The chart gives a better idea of the importance of tasks, the time taken by each task, any bottlenecks or dependencies, delivery deadlines, etc.
The user can drag the separation bar between the right-hand and left-hand portions of the schedule.Using the right-hand button, the user can zoom in or out of the schedule in order to gain a more detailed or more general view of it.
5.3.4.2 Work packages and tasks
To enter this screen, the user must have permission to perform operation 4.1. The screen shows work packages created for the project. If no work packages have yet been created for the project, the following screen will appear:
From here, the user can add a work package. By clicking on the button, the user will open a form for creating a work package.
The form enables the user to specify name, description, work package dates, participant and entity in charge, planned hours, work package type and assigned participants.
To indicate the dates in day/month/year, the user must deselect the box for logical dates in Project data.
To assign individuals, they must previously be entered into the project in the section Projects: participants. To enter project hours for work packages and participants, the user must first assign participant hours to the work packages. More information on entering hours appears in My GPR: timesheet and Project: timesheets.
[FIGURA: rellenando formulario]
The system will notify the user if the entered data have been saved correctly.
Dates for a work package can fall outside the project dates, but the system will issue a warning if the user saves a work package with this inconsistency.
If a work package has no tasks, the user can edit the estimated work progress represented by the work package. This information, along with the hours of participants assigned to the work package, is used to calculate the Cost Performance Index, which provides information on deviations for the work package. See Projects: totals.A work package can be removed, provided that no assigned users have entered hours for the work package. If a user wants to remove a work package with entered hours, all users will need to remove the entered hours for that work package. See My GPR: timesheets and Projects: timesheets.
Removing a work package also removes all of its tasks, milestones and deliverables. The user will receive a request for confirmation before definitively removing the packet.
When work packages are created for a project, the user can then add tasks to them by clicking on the button Add task for adding tasks:
As in the case of work packages, a form will enable the user to enter a task. The requested fields are similar as well: name, description, task dates (which must fall within the dates of the relevant work package for the form to be saved), participant and entities in charge.
In addition, the user must enter the weight of each task within the work package and the task progress, defining both items as a percentage. When creating a task in a work package, the system checks that the total weighting does not exceed 100%. In this way, if a work package has tasks, then progress in the execution of the work represented by the work package is calculated based on the weight and progress of the tasks included in it.
Similarly, the progress of a work package, along with the hours entered by participants assigned to it, is used to calculate the Cost Performance Index, which provides information on deviations in the work package. See Projects: totals.The system notifies the user when a task is added successfully.
Tasks can be removed in the same way that work packages can be removed. User confirmation will be requested.
5.3.4.3 Milestones
To enter this screen, the user must have permission to perform operation 4.1. Here, the user can see the work packages created for the project, along with the milestones pertaining to each work package. A milestone can only be added to an existing work package. The display of the screen appears below:
If the user clicks on the work packages, a button will allow the addition of a milestone.
The forms for work packages cannot be modified from this screen. They can only be edited in Work packages and tasks the user has adequate permission. This screen only permits the user to manage milestones for each work package.
By clicking on Add milestone, the user will see the form for adding a milestone. The user must indicate name, description, milestone date (which must fall within the dates of the pertinent work package for the form to be saved), participant, entity in charge and status of milestone.

When the form is completed, it needs to be saved. The system then notifies the user.
The user can remove a milestone by clicking on the option Delete milestone.
5.3.4.4 Deliverables
To enter this screen, the user must have permission to perform operation 4.1. This screen displays the work packages created for the project and the deliverables for each work package. Deliverables can only be added to an existing work package. The display of the screen appears below:
By clicking on the work packages, the user will see a button for adding a deliverable.
The forms for work packages cannot be modified from this screen. They can only be edited in Work packages and task if the user has adequate permission. This screen only permits the user to manage deliverables for each work package in a project.
By clicking on Add deliverable, the user will see the form for adding a deliverable. The user must fill in the following sections: name, description, deliverable date (which must fall within the dates of the pertinent work package for the form to be saved), participant and entity in charge, whether the deliverable is internal or external, deliverable type and status.
When the form has been completed, it needs to be saved. The system will then notify the user.
Deliverables can be removed by clicking on the option Delete deliverable.
5.3.5 Projects: schedule
To enter this screen, the user must have permission to perform the operation 9.1. By clicking on the option Agenda, the user will see the following schedule information:
The display shows a set of scheduled project events. The events are grouped into meetings and conferences. By clicking on meetings or conferences, the user will see the corresponding items listed chronologically by the start-date of each event.
To add a new event, the user must click on the option to create a new conference or new meeting and fill in the form that appears.
When the user has completed and saved the form, the event information is sent to the individuals affected by the meeting or conference through their warning panels. In addition, the event appears in the project calendars of the participants. For more information on the functioning of the warning panel or calendar, see Personal workspace: start.
To display event information or modify it, the user must click on the event in question. For conferences, the only restriction beyond completion of the required fields is that the end-date and time must come after the conference start.
In the case of meetings, the end-time must also come after the start-time. In addition, the individual convening the meeting and the people attending the meeting can be any user registered in the system.
In both cases, the information can be edited by clicking on the corresponding item, modifying the information and saving it.
Meetings and conferences can be removed by clicking on the corresponding icon. The system will request confirmation to perform this operation.
If any error occurs in the above actions, the user will receive a notification indicating the reason.5.3.6 Projects: accounting
To gain access to project accounting, the user must have permission to perform at least one of the following operations: 3.2, 3.3, 6.1 and 6.2.
This section contains three subsections, which are explained in detail under the following points.5.3.6.1 Budget
Access to the budget screen requires user permission to perform operations 3.2 or 3.3. The first operation permits the user to consult or edit the budget of the entity for which the user is participating in the project. The second operation gives the user access to all budgets for all entities participating in the project.
There are three types of project budget: submitted, approved and justified. They refer to submitted projects, approved projects, and justified projects, respectively.
The display of the screen appears as follows:
The upper portion shows a selector with the budget types that can be consulted. Depending on project status, some budgets may only be consulted. More information on project status and the phases associated with project status can be found at Projects: project data. If the project has been submitted or reached a more advanced status, the submitted budget cannot be edited. Similarly, an approved budget cannot be edited for a project in execution or in any subsequent phase. Lastly, a justified budget can be edited irrespective of the project status.
Below will appear the participating partners with their individual budgets. By clicking on any with a budget in submitted status, the user will see the following:
The vertical axis lists the budget items, while the horizontal shows the years or project duration. Lastly, the totals appear by item and year.
If the project budget is not linked to GREC, the user can edit all the boxes and the system will update the annual and item totals.
However, if the project and its budget are linked to GREC (see Projects: project data), the total figures will appear, because that is the information that figures in GREC.
If the user wants to change the budget, he will only be allowed to change the annual distribution of expenditure by shifting expenditure between budget items. The user will not be allowed to change the total budget figure.
With the appropriate permissions, the user will also be able to view the budgets for other entities and their budgetary distribution. The user can enter a description for each item in the budget in order to give more precise information on each figure. By clicking on the icon that appears next to items, the user will see the following dialogue box:
If the user enters a comment, the comment will be automatically saved and the system will notify the user of the result.
Changes to any budget need to be saved. The system will notify the user of the result of such changes.
5.3.6.2 Income and expenditure
To access this screen, the user must have permission to perform operations 6.1 or 6.2. The first operation permits the user to consult or edit the expenditures of the entity for which the user is participating in the project. The second operation gives the user access to all expenditures for all entities participating in the project.
This subsection displays the project income and expenditure (i.e. project transactions). Please note that transactions that have been unsubscribed o cancelled do not appear. The screen appears as follows:
The screen can display project expenditure between two dates. The date filter only affects the transactions shown on the screen.
The option to import data from the FBG or SICUB accounting system is only available to users who, as participants in a UB project, can make modifications by means of operation 6.1 or if the project has a GREC code (linking the project to GREC) and the user has the code for the corresponding partner. More information on this aspect can be found at Projects: project data.
Clicking on the button Import does not affect the date filter; all expenditure is imported or existing expenditure is updated.
The system enables an administrator to configure the assignments between expenditure and budget templates. That is, if a project has a specific budget template assigned to it in Projects: project data, and the template defines a SICUB assignment and FBG assignment, and also the project allows for transactions to be imported, then the transactions will automatically be allocated to the project’s budget items.
As a result, when a transaction is imported to a project with these characteristics, the system will show the line item to which the transaction is automatically allocated and display a button to validate the automated assignment. If the user wishes to change the line item to which the system has automatically allocated the translation, the user only needs to enter the transaction details and select the appropriate line item.
When the user validates a transaction using the validation button or manually, the system will display a button to cancel the current assignment in the line corresponding to the transaction.
The system also enables the user to validate all transactions appearing on the screen at any given moment.
In addition, the screen can display the degree of validation for the transactions of entire project. The degree of validation is the number of transactions assigned manually to a budget item divided by the total number of project transactions.
If any transaction cannot be assigned automatically to a budget item, the system will request the user to validate the transaction manually and assign it individually to a budget item.
If the user returns to the list of transactions and clicks on one of them, the details for that transaction will appear
This form enables the user to edit fields and change the assignment of a transaction to a budget item.
The system will notify the user when the form has been modified.
If the project is not linked to a GREC project, the project’s transactions must be input manually.
In order to add any expenditure manually, the user needs to click on the button Add.
To finish, the user must fill in the expenditure entry in the form.
When the form is completed and saved, the transaction will appear in the list of project expenditures.
5.3.6.3 Financial status
To access this screen, the user must have permission to perform operations 3.2 or 3.3 and 6.1 or 6.2. The first operation permits the user to consult or edit the financial status of the entity for which the user is participating in the project. The second operation gives the user access to the financial status for all entities participating in the project.
This screen enables the user to consult a project’s economic status for each line item, year and partner.
If there are project expenditures, they will directly affect the project balance. This is because actual transactions are subtracted from budgeted line items.
Actual or committed expenditure in previous financial years relate to processed invoices, while expenditure in the current financial year relates to committed expenditure and processed invoices.
The screen appears as follows:
In the upper portion of the screen, the user must choose the entity for which he wishes to check the financial status.
Once the partner is selected, the display will show the budgeted amount, the spent amount (the sum of all expenditure assigned to the item in Income and expenditure) and the balance for the item in that year for each line item and each year of the approved budget (see Budget).
The totals will also appear by item and year.
For each item and year, the user can consult the descriptions entered in the budget by dragging the cursor over them.
In addition, two graphs can be displayed to show the distribution of expenditure by year (bar graph) and by item (pie chart), if there is enough data available.
NOTE: Currently, for projects linked to GREC and SICUB, the financial status shown comes entirely from SICUB. As a result, items and years appearing in the financial status may not match the budget.
5.3.7 Projects: task list
This function is not included in this version of the application.
5.3.8 Projects: documents
By clicking on Documents, the user can open the document screen. To do so, the user must have permission to perform operation 2.1. When the user opens this section, the project’s document folder will appear.
The project’s folder and file tree appears to the left, while the forms for each folder and document appear to the right when the user clicks on them.
If the user clicks on a folder, the system shows the form of the folder as seen in the previous figure.
The form offers the user the options of modifying folder data, creating a sub-folder within a folder, or creating a new document.
To create a sub-folder, the user must click on New subfolder. A blank form will open and the user can edit the properties of the new folder.
Similarly, a user wishing to create and upload a new document must click on the button New document.
To upload a document, the user must fill in a form specifying a short list of meta-information: document type, status, authors, and key words. The user can also attach a document from his file system.
Once a document is created and uploaded, the system notifies the user and displays the document data. The document can then be downloaded, the data on the form can be modified and the document can be uploaded again.
The maximum file capacity is 7 MB.
Just as the system permits the creation and modification of folders and documents, the system enables the user to remove folders and documents.
In the case of folders, if the user removes a folder, the folder’s contents are also removed. In other words, any documents or sub-folders within the folder will be deleted.If the user saves, deletes or performs any other type of action, the system will inform the user of the result of the process and it will update the directory tree with the new information.
5.3.9 Projects: timesheets
To gain access to this screen, the user must have permission to perform operation 7.2.
This operation is similar to the operation in, Personal workspace: timesheets, but from the project perspective. Official project participants can enter their hours here.
This section displays all project participants who are allowed to enter their hours. Total hours will be calculated by user and by project. To enter and save hours, the following rules apply:
- The user must enter and modify hours within the dates specified for each work package and project.
- The user cannot enter more than 24 hours across all projects for a given day.
- The user cannot enter more than eight hours across all projects for a given day. If the user does so, the system will send a warning. (This limit can be configured at the application level.)
- The user can only enter hours for the current day and previous days.
By clicking on a user, the system shows the set of work packages in which that user is participating on the project in question.
The display shows a single month, although the user enters hours daily. The user can change the year and month being displayed.
The user cannot enter hours for holidays or non-working days. The system marks these days as a reminder that they are not authorized for input.
When the user enters hours for a given day, the system updates the totals. If the total exceeds the maximum values, the system will inform that user that too many hours have been entered or that the total assigned to a work package, project or user is too high.
Lastly, the system will notify the user when changes are applied.
In case of errors, the system will inform the user of the problems arising.
5.3.10Projects: totals
To enter this screen, the user must have permission to perform operation 7.2.
The screen will display the following information:
The data give general information of the project’s current status and each work package with respect to time management.
Total hours entered for each work package can be consulted in the following format (bracketed names and abbreviations reflect PMBOK, which refers to earned value technique):
- Planned hours (PV, Planned Value). This forms part of the work package when it is created.
- Actual hours (AC, Actual Cost). This is the total hours entered by all researchers for the work package.
- Progress (SPI, Schedule Performance Index). This forms part of the work package. See Work packages and tasks. If work package has tasks is the sum of all progress tasks being progress task equal the product of progress of the task and weight of the task
- Hours gained -Earned value (EV = SPI*PV).
- Variation of hours - Cost variance (CV = EV-AC).
- Schedule variance (SV = EV-PV).
- Cost performance index (CPI = EV / AC).
In addition, the user can find project totals with the same fields (bracketed names and abbreviations reflect PMBOK):
- Planned hours (PV). Total planned hours for all work packages.
- Actual hours (EV). Total hours of work completed for all work packages.
- Progress (SPI). Average weighted progress of all work packages SUM(progress_wp * hplan_wp) / hplan_project). (progress_wp: work plan progress; hplan: work package planned hours; hplan_project: project planned hours).
- Earned value (EV = SPI*PV).
- Hours gained -Cost variance (CV = EV-AC).
- Hours variance -Schedule variance (SV = EV-PV).
- Cost performance index (CPI = EV / AC).
5.3.11 Projects: project search
To use this function, the user must have permission to perform operation 1.3.
To the right of the menu area, the user can find the project search engine. By clicking on the button Filters, the user can select additional search filters.
To use this type of search, the user must use the search box. The user can enter one or more words or parts of words and search for them in the various projects stored on the system.
Search results will display project name, along with an indicator identifying the degree of certainty for the result obtained. In addition, any project description will be displayed.
The system enables the user to improve searches by applying filters. The filters offered by the search engine are:
- Own projects: this displays the user's assigned projects or projects in which the user has participated. If the user has restricted permission for operation 2.5, he will not be allowed to disable this option.
- Project status: this enables searches of only those projects with the selected status.
- Convening body: this filters for the project’s convening body.
- Project start-date: if the user selects a start-date, the results window will display all projects with start-dates the same as or later than the selected date.
- Project end-date: the results window will display all projects with end-dates the same as or earlier than the selected date. If the user selects start-date and end-date, the system will display all projects falling within the two dates.
By using filters, the user will get fewer, more limited search results.
Search results appear in page format. To view all results, the user must scroll down the results screen. Search results appear in order by degree of certainty. In other words, the system interprets the extent to which the search results match the user’s search criteria.
The search engine ignores prepositions, articles, determiners, single letters, connectors, monosyllables and some other words.
5.3.12 Projects: automated document generation
Use of this function requires the user to have permission to perform operation 12.1.
Below is a list of the document types which the system can automatically generate and the screen where they can be generated.
Within each project, the user can automatically generate a set of preset documents based on structured information entered by the user.
TYPE OF TEMPLATE
SCREEN
Proposal for submission
Projects: project data
Proposal planning
Project: work planning, schedule
Proposal budget
Projects: accounting, budget
Meeting minutes
Projects: schedule, meetings (date of specific meeting)
Project tracking report
Projects: main
Project financial justification report
Projects: accounting, financial status
The screens listed in the table contain a button that activates a dialogue box allowing the user to choose the desired document based on type. (Additional document choices may appear under each type, e.g. Template for submission of a European proposal and Template for submission of a Ministry proposal.)
When the user clicks on the button, the following dialogue box appears:
In this screen, the user must choose the document type that best fits the project type in question.
The user can also select the desired output format and existing project folder to save the automatically generated document. The choice of output formats includes: MS Word (*.doc), OpenOffice (*.odt), PDF (*.pdf), and RTF (*.rtf).
The user can select a folder in his project directory in which to store the automatically generated document.
When the user has completed this step, the document can be downloaded and viewed through the section Project documents. The document definition will state the template name, along with the date and time of generation.
5.4 Options
This section provides details on all the operations related to options. As with previous sections, the set of operations described below can only be performed with the necessary permissions.
To enter options, the user must click on the link Options, as displayed in the figure below:
The screen will display the available operations, which are explained in detail in the following points.
5.4.1 Options: budget templates
Access to budget templates requires the user to have permission to perform operation 3.1.
5.4.1.1 New template
Clicking on this subsection opens a new budget template, which appears below:
The system is preconfigured with five budget templates, one for each type of project (see Projects: project data).
To set up a budget template, the user needs to enter the template name and add budget items.
If necessary, the user can also delete budget items entered incorrectly.
To give more flexibility in the creation of the budget, the user can reorder budget items and avoid the necessity of recreating the budget after making any mistakes in the ordering.
In addition, if a previous budget is similar and the user does not wish to create a new budget from the beginning, the system enables the user to select an existing budget as a basis for the new one.
When the user chooses an existing budget as a basis for the new budget, the system will copy it and the user can then adapt it as required.
Lastly, the system will send a message indicating the result, when the user applies changes and saves the budget form.
The system will notify the user of any unfilled fields, such as template name.
5.4.1.2 Editing template
Clicking on this subsection allows the user to edit the budget templates. The user will see the following screen display:
As the figure shows, the user will find a selector for choosing the budget template which the user wishes to edit.
When the user has selected a template, the template contents appear on the screen.
The user can then make the changes required to modify the template, changing, adding or deleting budget items.
After making modifications, the user needs to save them by clicking on the Save button.
If there are any errors, the program will show them to the user and indicate the kind of error involved.
If the user finds that the budget template cannot be edited, this is because the template is already assigned to another project. Once a template is assigned to a project, it can no longer be edited because that could cause inconsistencies.
5.4.1.3 SICUB assignment
By clicking on this subsection, the user can configure the auto-assignments performed by the system on the budget items of a given template and the types of SICUB expenditure.
The screen displays a selector enabling the user to choose a budget template.
After the selection of the template, the user can assign budget items and types of expenditure to each line in the template. Similarly, the user can delete any incorrect entries.
When the budget items have been assigned, the user needs to save the template so that imported SICUB expenditure will be auto-assigned to the correct budget items (see Income and expenditure).The system will inform the user of any type of error.
5.4.1.4 FBG assignment
By clicking on this subsection, the user can configure the auto-assignments performed by the system on the budget items of a given template and the types of FBG expenditure.
The screen displays a selector enabling the user to choose a budget template.
When the budget items have been assigned, the user needs to save the template so that imported FBG expenditure will be auto-assigned to the correct budget items (see Income and expenditure).
After the selection of the template, the user can assign budget items and types of expenditure to each line in the template. Similarly, the user can delete any incorrect entries.The system will inform the user of any type of error.
5.4.2 Options: new document template
To gain access to this screen, the user must have permission to perform operation 12.2.
If the user clicks on this section, the following screen appears:
The screen resembles the folder of a specific project (see Projects: documents), However, the folder managed through this screen is an application folder, not a specific project folder.
Through the New document template function, the user can administer (upload, update, erase) the templates that the application is going to use for the automated generation of documents without needing to restart the server. This is a delicate operation, so it is important that only users with an administrator profile should have modification permission for this operation.
Each of the above document types has a data dictionary that consists of a list of possible fields in the data model, i.e., the fields that appear in the templates designed by the administrators. The data dictionary for each template type will define the domain of data that can be entered in the template.
In this way, the administrator can use OpenOffice (format *.odt) to create various templates for each document type that must be generated, with tags that represent the data dictionary fields for the given document type.
The system enables the user to upload all document types, storing various kinds of information in the repository for the creation of a template. However, when the user is generating documents, the system will display document templates only in *.odt format.
Once the template is created, the administrator must upload it to the sub-folder of the screen representing the type to which the template belongs in order for users to generate documents automatically from the template. The administrator can upload in sub-folders as many as templates as desired.
It is the responsibility of the user administering the document templates to ensure that the templates uploaded to the application using this function only make use of correct tags with data from the data dictionary for the template type involved.
5.4.3 Options: editing user profiles
Access to this screen requires the user to have permission to perform the operation 1.4.
By clicking on this section, the user will see the following screen:
From this screen, a user can search system users in order to modify their permissions. The image shows how to search and how results are displayed:
When a user is selected, the system shows a form with the user’s permissions. The user’s profile can be adjusted globally by selecting one of the predefined profiles or the user’s permissions can be personalized as a function of the operations that the user is going to perform.
After permissions are modified, the changes need to be saved.
If a user’s permissions have been modified, the user will see the changes on this screen when entering the system again. Changes are typically made by the system administrator.
6 Personalization of environment
A description of the configuration of the application environment appears in the Administrator’s Manual (ADM). The following section only shows the application values that each user can personalize.
6.1 Changing settings
This section discusses the setting values that the user can personalize in the application.
The data that the user can configure are:
- User profile
- Configuration of application and personal workspace
- Module personalization and functions
6.1.1 User profiles
To change the user profile, the user needs to click on the option Profile in the upper right-hand menu.
The screen will display the following form:
The form enables the user to modify his annual hours dedicated to research, any alternative email address (if the user wishes to receive notifications at an email address different from the UB email address), telephone number and Skype user identification. The form also enables the user to change the personal photograph in the application. The other data cannot be modified, because they are provided by the UB’s office Systems and Exploitation. If any of the data from Systems needs to be changed, the user must request changes directly from that office.
The personal photograph cannot exceed 512 Kb. The user can upload photos in the following formats: JPEG (*.jpg/*.jpeg), GIF (*.gif) and PNG (*.png).
If the user makes changes and saves them, the system will issue a warning in the lower right-hand part of the user’s screen to notify of correct completion of the operation.
The screen will also display reserved and committed hours (see definitions for Warning panel in en Personal workspace: start). This function enables a researcher to view his total reserved and committed hours in the year to date.

As shown in the figure above, a user can also consult his Profile permissions in the application from this screen.
6.1.2 Configuration of application and personal environment
As in the previous point, the user can configure the application and personal workspace by clicking on Configuration in the upper right-hand menu, as follows:
The form enables the user to personalize the application according to user preferences. Module color and screen background can be changed. The user can also manage the modules that he wishes to appear on the screen, the feeds that he wishes to see in the RSS panel and the URL of the iCal calendar that he wishes to integrate in the application’s calendar box.
If the user modifies the configuration and saves changes, the system will send a message in the lower right-hand part of the screen to confirm the successful completion of the process. The system will then reload the application with changes.
6.1.3 Module personalization and functions
The screen Personal workspace: start, displays a set of modules previously selected by the user. Each module offers four functions:
- Minimize module.
- Maximize module.
- Arrange content and change module colour.
- Close/Quit module.
In addition to the above configurations, the user can arrange and resize any of the modules so that they appear as the user wishes.
A. List of error messages
Below is a detailed list of the various types of errors that can occur while using the application:
- Pop-up message: this appears when the user performs an incorrect action or when an error occurs during an operation. The error message informs the user of the problem that has occurred.
The error message can indicate that the data has been entered incorrectly or that the system is not functioning correctly.
- Session failed to start or session timed out: this appears on the screen to tell the user that the session has timed out or has failed to start, and it redirects the user to the authentication screen.
If the user’s session has timed out, the user will need to complete authentication again.
- Inadequate permissions to perform an operation: if the user reaches a screen for which he does not have permissions, the system will notify him that he has inadequate permissions to access or perform the operation.
The user can review user permissions through the link User profiles. An administrator can review permissions through Editing user profiles, and allow a user to perform specific operations. The system can also indicate that a user is trying to enter an area for which he does not have permission.
- System error. A user seeing this message should consult the administrator. It is serious and requires special treatment. The user needs to note the date and time when the error occurred so that the error can be identified.
Then the user needs to contact the system administrator to evaluate the error and determine the problem and its solution.
B. Terminology (Glossary)
BBDD: Database
UB: University of Barcelona
AUTEN-UB: User Authentication System of the University of Barcelona
FBG: Bosch i Gimpera Foundation
SICUB: Accounting Information System of the University of Barcelona
GPR: Research Project Management
SES: System Functional Specification
ADM: System Administrator’s Manual
INM: System Installation Manual
GREC: Research Management System
PMBOK: Project Management Body of Knowledge. Project management standard by Project Management Institute (PMI).
C. References